How to add CI/CD to my CDK project
TLDR
I already have a CDK project on GitHub here, but to deploy it I have to run the CDK Toolkit command cdk deploy from my local machine.
I want to add automation to my deployment process and integrate it with the AWS ecosystem… so I will use the AWS Developer tools to do it.
I will show you 2 different approaches:
- Create the pipeline with the AWS Console: Why? Helps you understand the low level of the solution and how AWS services work
- Create the pipeline with IaC (CDK): Why? You should always try to automate everything. In this case, I will create the pipeline that will allow us to deploy the CDK code automatically.
I want to implement the simplest solution, with the KISS principle in mind, and for this reason, my architecture diagram is as follows:
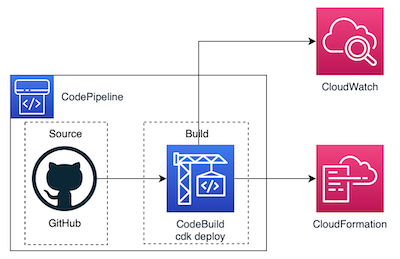
Explanation: In a CDK deployment, I don’t need to run the cdk synth command and manage the generated artifacts, so the simplest solution is to run the cdk deploy command directly.
If you need more information about it, I wrote a related post: How to create infrastructure with CDK.
However, upon investigation, the AWS recommendation to deploy a CI/CD pipeline of CDK projects is something similar to the following:
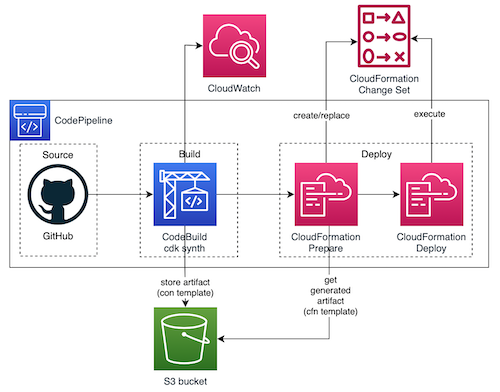
I will explain it in detail in this post.
I have preferred to include all of information in the same post, although I could easily split it in 2 or 3, and this post have a lot of content and images.
1. Introduction
Before I start showing you how to add the CI/CD I will introduce you to the basic concepts involved:
SDLC (Software Development Lifecycle)
is a process for planning, creating, testing, and deploying an information system - Wikipedia
Depending on where you look, there will be a different number of phases in the SDLC process.
For this article, we will explain what means CI/CD over 4 phases of the software release process: source, build, test and production (deployment):
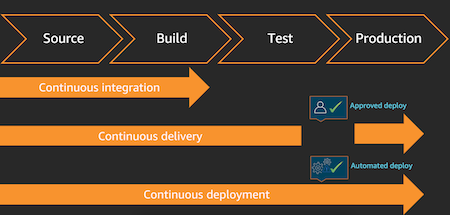
CI/CD refers to Continuous Integration and Continuous Delivery and it introduces automation and monitoring to the complete SDLC.
Continuous integration (CI) is a software development practice where developers regularly merge their code changes into a central repository, after which automated builds and tests are run
- The key goals of CI are
- to find and address bugs more quickly,
- improve software quality,
- and reduce the time it takes to validate and release new software updates
- Continuous integration focuses on smaller commits and smaller code changes to integrate
Continuous delivery (CD) is a software development practice where code changes are automatically built, tested, and prepared for production release
- Benefits
- Automate the software release process
- Improve developer productivity
- Improve code quality
- Deliver updates faster
- The point of continuous delivery is not to apply every change to production immediately but to ensure that every change is ready to go to production
Continuous deployment (CD), revisions are deployed to a production environment automatically without explicit approval from a developer, making the entire software release process automated.
So yes, the “CD” in “CI/CD” means 2 different things:
- Continuos Delivery (prepare deployment to prod)
- and Continuos Deployment (deploy automatically in prod)
2. CodePipeline for CDK with AWS Console
First, we will create the solution with the AWS Console because it helps to understand how the services involved work.
As we want to create a new Pipeline, we must access to CodePipeline service and click on Create pipeline.
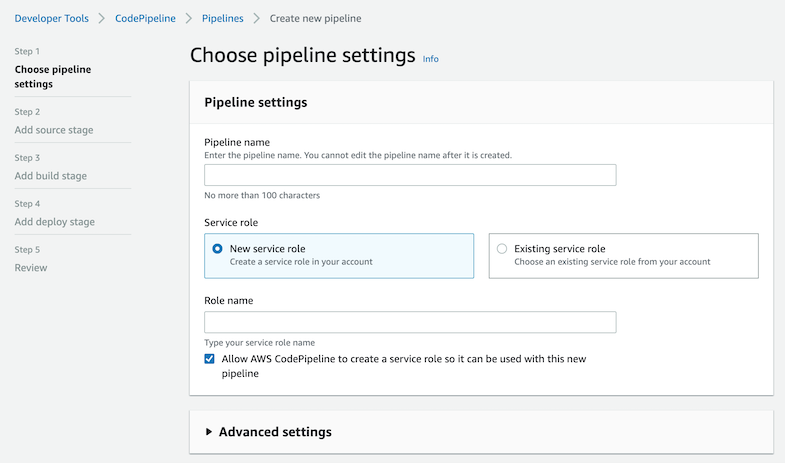
Step 1 in CodePipeline is to choose the pipeline settings. We have to create a new service role (or use an existing one).
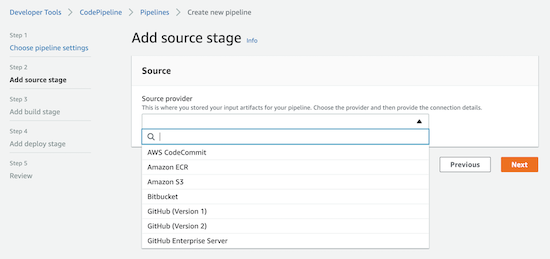
Step 2 is to add the source of the stage choosing the source provider. I have my code repository on GitHub so I choose GitHub (version 2) but you could choose a different one.
There are 2 options for GitHub source provider:
- version 1 (not recommended) which uses OAuth apps to access your GitHub repository
- version 2 (recommended) which uses a connection with GitHub Apps to access your repository
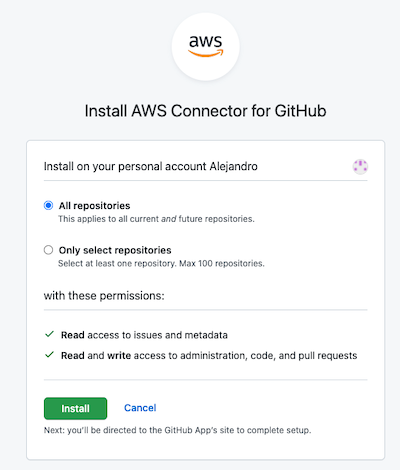
If you choose GitHub version 2, the next step is to create a new connection to GitHub and if you don’t have any GitHub App created you need to create a new one, so you should click on Install new app.
You have to choose whether to create the connection for all repositories or only th selected ones, and click Install.
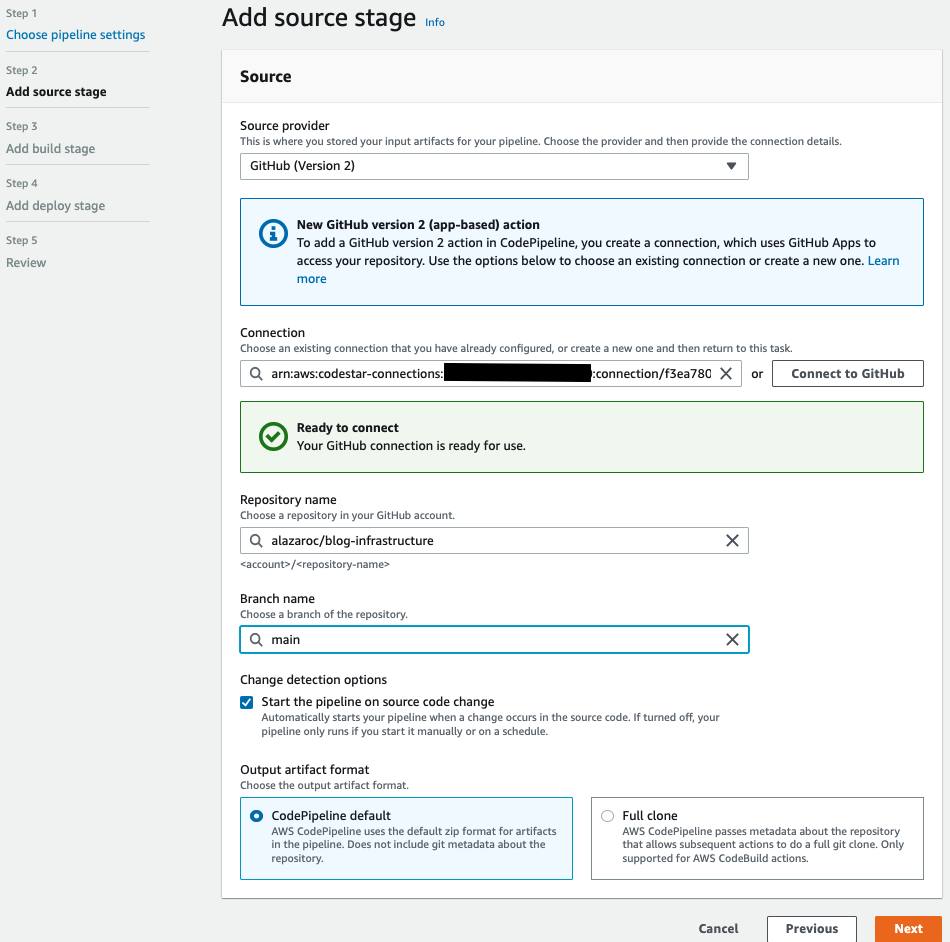
The GitHub connection is ready to use and you will be redirected to Step 2 of the creation of the CodePipeline.

Now you can choose your repository and your branch and click on Next.
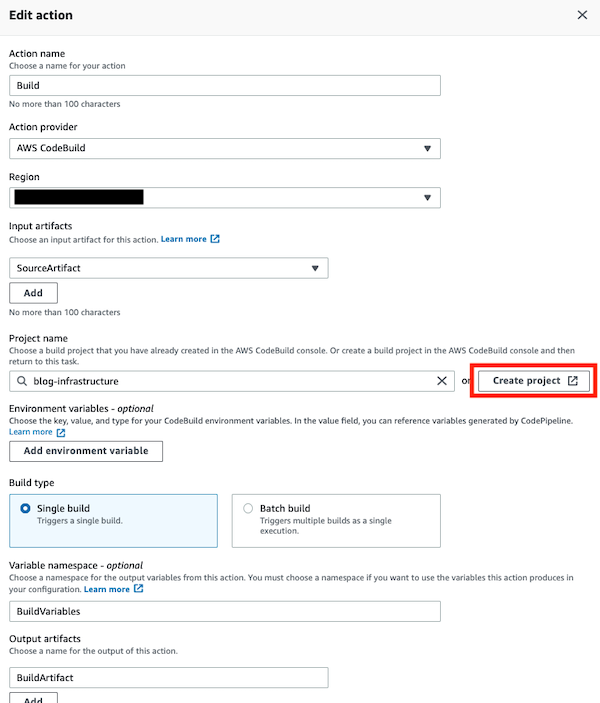
Step 3 is to add the build stage, and you should select AWS CodeBuild because we want to use this service to add custom commands.
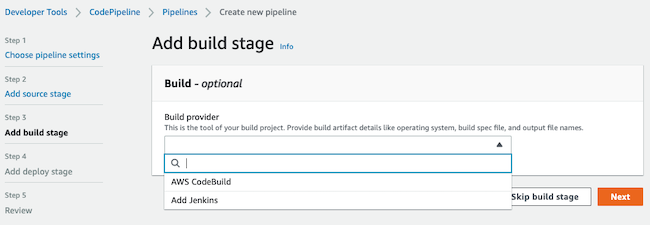
After that, select the region, a project name, and a single build and click Next.
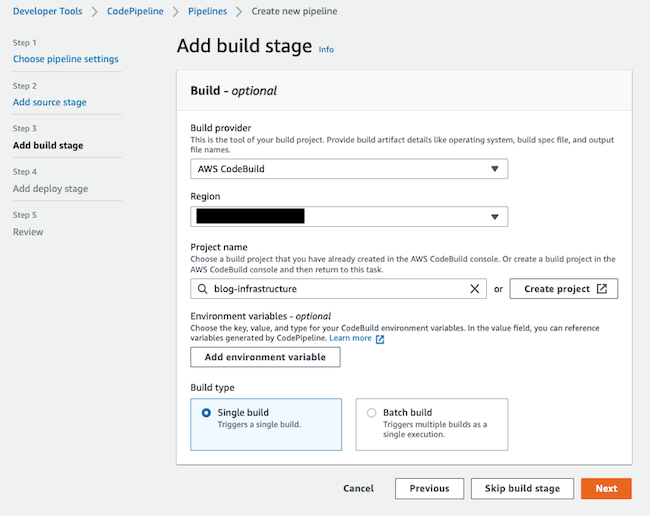
With this specific configuration, it will fail, do you know why?
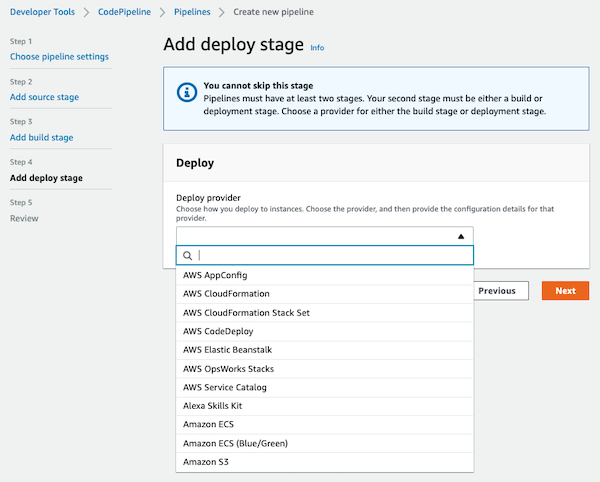
Step 4 is to add the deploy stage. Here are all the available options but we skip this step because we don’t need it.
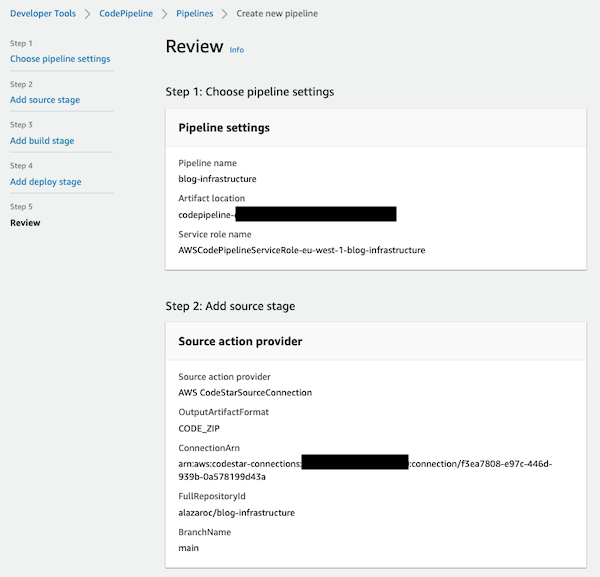
Now the CodePipeline is ready to be created and a review page is displayed. Confirm and create the CodePipeline.
It is done. We have created the CodePipeline and added 2 stages:
- Source
- Build
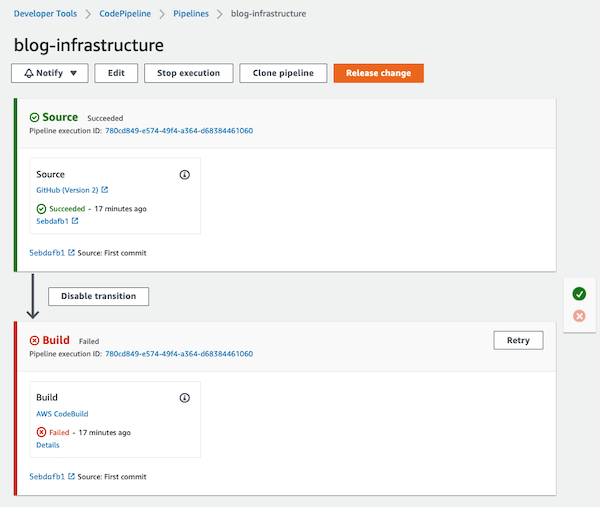
First execution…
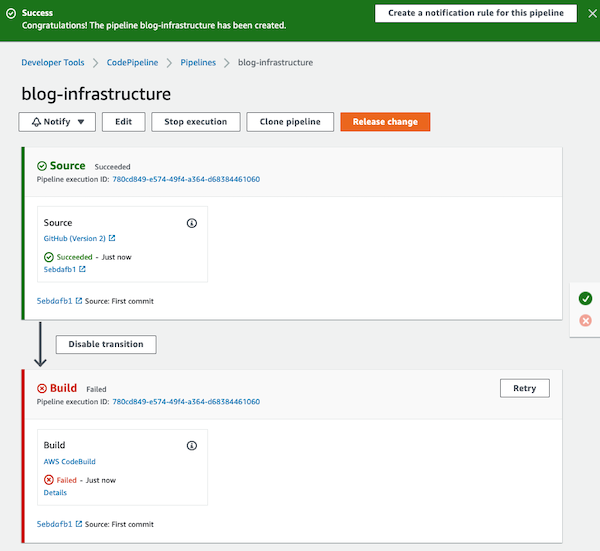
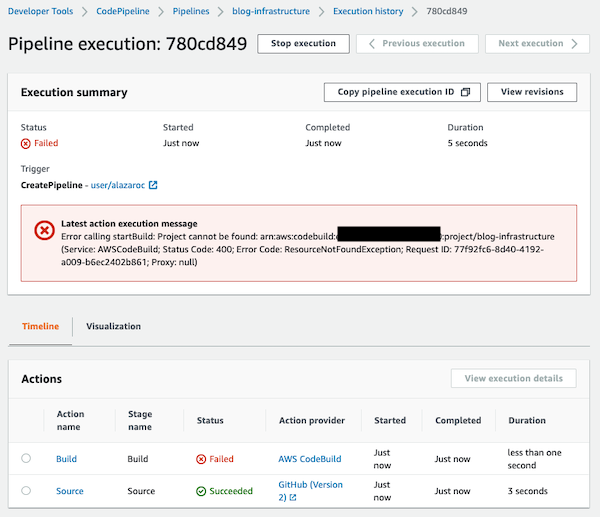
As you can see the execution had failed!
Do you know what caused the error? Let’s investigate it…
If you click on the execution ID link, you will be redirected to the pipeline execution summary and you will see the error message Project cannot be found in CodeBuild.
Also, you can click on the AWS CodeBuild action name and you will be redirected to the CodeBuild service… where you will receive the same error information: “Resource not available”.
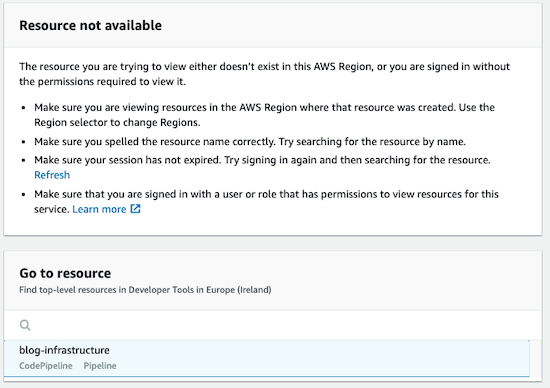
Yes, there is no CodeBuild project created in the pipeline, we just add a name of a created CodeBuild resource (and this resource doesn’t exist because nobody has created it).
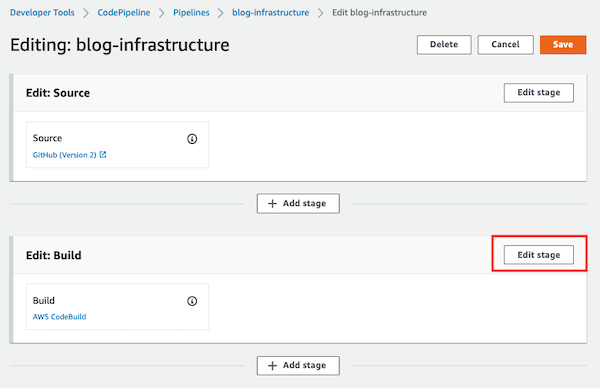
To fix it, you need to edit the Pipeline and edit the Build stage to create a new CodeBuild project.
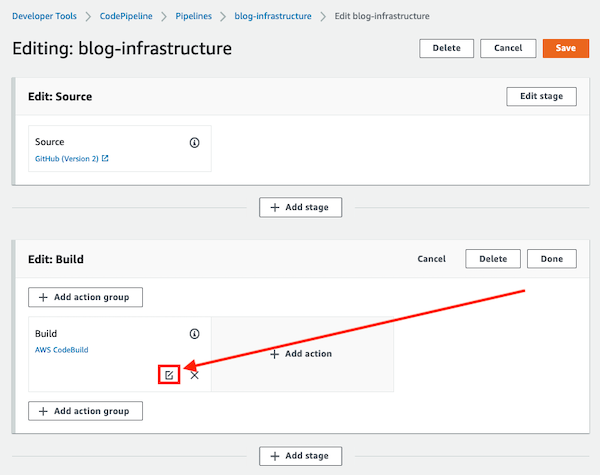
A new window will be opened, the Build stage will be editable and you need to click on the Create project button.
You can create the build project by choosing the following:
- Operating System:
Amazon Linux 2 - Runtime(s):
Standard - Image: the more updated image
- New role name
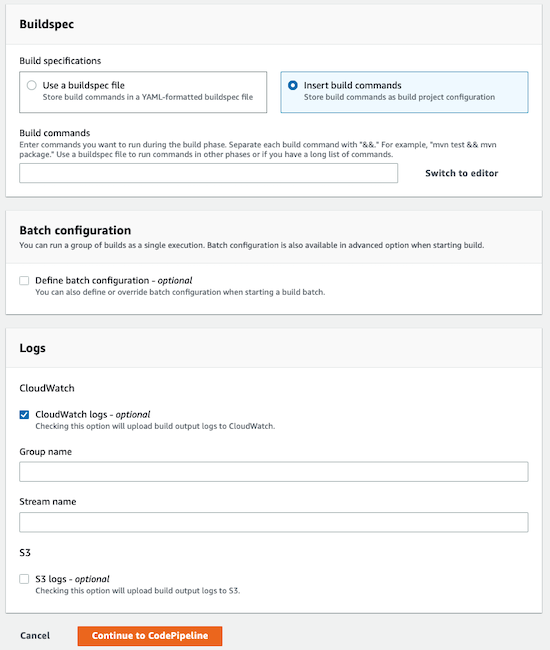
Buildspec:
Insert build commandsand click to Switch to editor and add the following:1 2 3 4 5 6 7 8 9 10 11 12
version: 0.2 phases: install: commands: - npm install - npm install -g typescript - npm install -g aws-cdk build: commands: - npm ci - npm run build - cdk deploy
- Add a CloudWatch log, choosing as Group name
/aws/codebuild/blog-backend-infrastructure
When you have finished filling in all fields, click Continue to CodePipeline.

Again, with this configuration the execution will fail. Do you know why?
You can now go back to the CodePipeline and force the execution again by clicking on Release change.
And, as expected, it fails again.
This time we will review the CloudWatch logs generated for this run to look for errors.
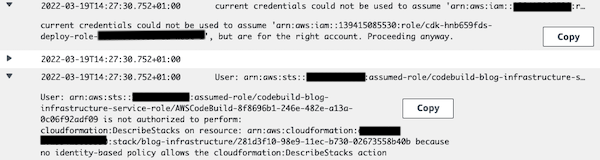
You can see that the CodeBuild role is trying to assume the CDK role to perform the CDK commands, and of course, we didn’t specify any permissions to the new role so it can’t assume any roles.
How CDK deploy works: Behind the scenes, when the
cdk deploycommand is executed, CDK is using the CDK roles created in the bootstrap process to perform some actions: perform a lookup, upload files and deploy the template uploaded in the S3 into the CloudFormation service.
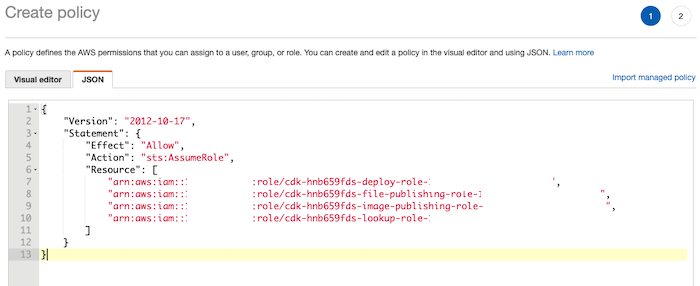
Therefore, you need to update the CodeBuild role to add the assumed permission to CDK roles. To do this, create new permission (new inline policy).
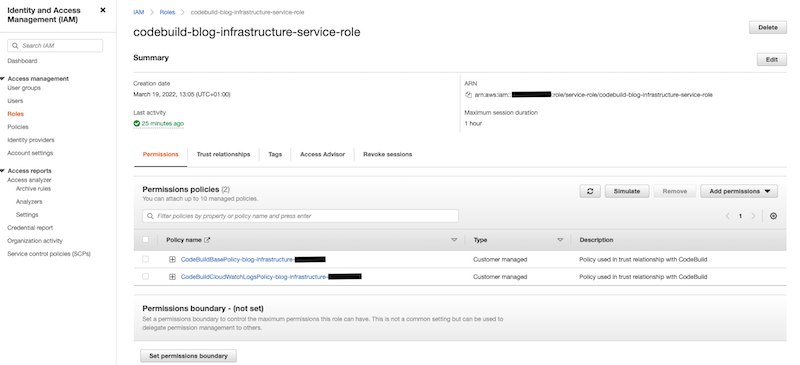
You must add the Action sts:AssumeRole and the Resources of the 4 CDK roles created in the bootstrap.
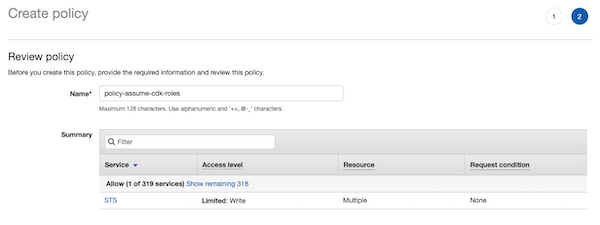
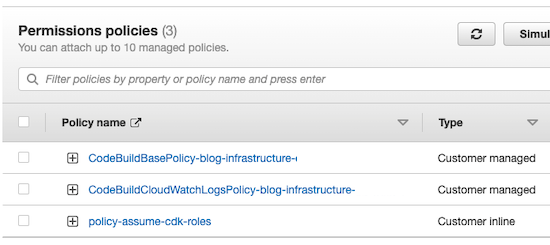
When is created, you can review that the new permission has been added to the CodeBuild role.
If you come back to the CodePipeline service and you execute it again, it will succeed!
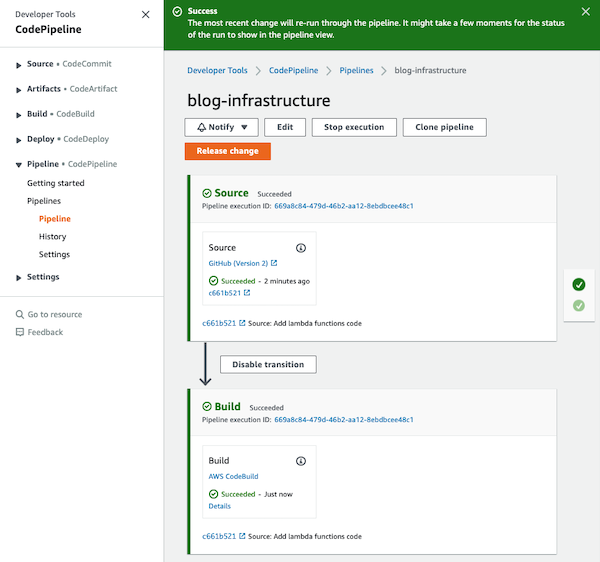
Now, if you make any changes in your repository, the pipeline will be automatically executed and your infrastructure will be updated executing the
cdk deploycommand of the CDK Toolkit inside of the CodeBuild service.
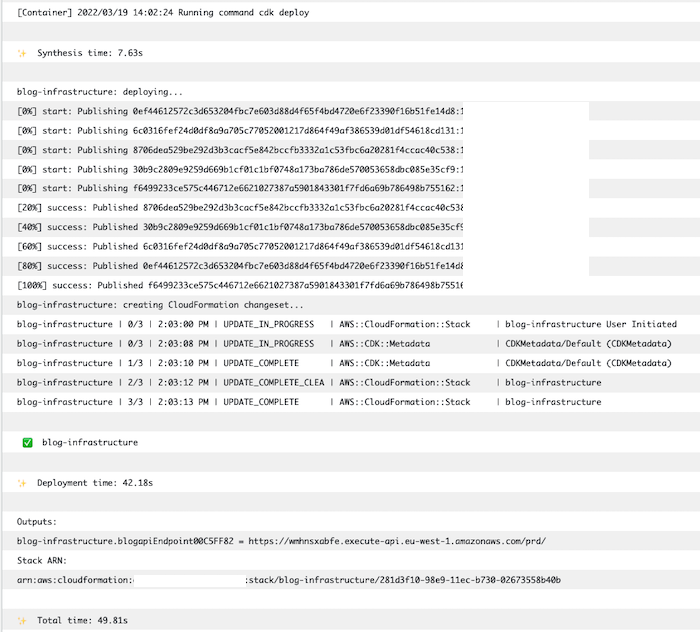
If you want, you can check the logs in the CloudWatch service to verify that the execution of the cdk deploy command went as we expected:
2.1. Improve: Use a Buildspec file inside the code
You have done a lot of manual work, and the first improvement you can automate is the definition of the build process itself.
You need to update, in the CodeBuild project, the buildspec configuration of the project, select Use a buildspec file and click to Update buildspec.
Now when the pipeline runs it will look for the buildspec file inside the code (in the root folder). You have configured the CodeBuild service but you don’t have the buildspec.yml file added to your code yet.
Next, you must add the buildspec.yml file with the same content you provided in the online editor to update the build commands in the code. More information about buildspec file
In the following image, you can see the VSCode IDE and the new buildspec.yml file with the same content as before.

2.2. Test it: automatic execution of the pipeline when a commit is done
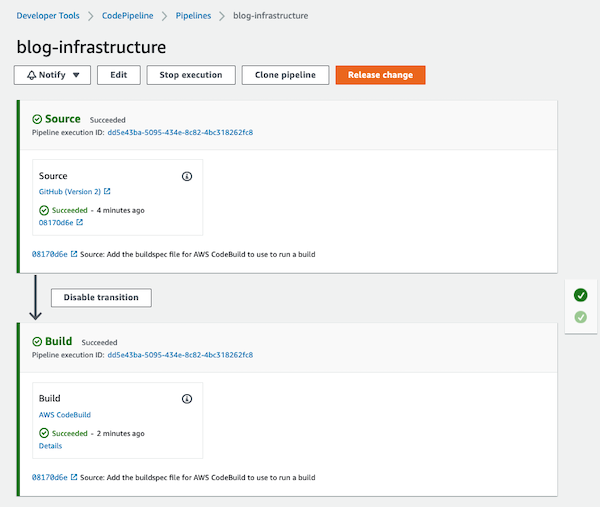
If you commit the new file to your repository (buildspec.yml)
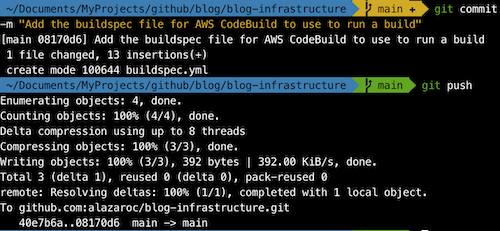
The pipeline runs automatically as expected
3. CodePipeline for CDK with IaC
Now that we have deployed the CodePipeline with the AWS Console, we will do the same with Infrastructure as Code with CDK.
To do this, I will add a CodePipeline resource to my CDK project for the blog.
I am using the GitHub v2 connection because it is the recommended way, and it requires first to use the AWS Console to authenticate to the source control provider, and then use the connection ARN in your pipeline definition.
In other words, if you use GitHub v2 you need create the connection manually!
3.1. Selfmutation property
I want to show you first how “selfmutation” works in CDK pipelines because this it is important to know.
This is the code to add the CodePipeline resource with 2 stages:
- Source with GitHub v2 (with a connection)
- Build phase (
cdk synth)
CDK pipelines will generate CodeBuild projects for each ShellStep you use
1
2
3
4
5
6
7
8
9
10
11
12
13
14
15
16
const codePipelineName = `blog-backend-infrastructure-cdk`;
const pipeline = new CodePipeline(this, codePipelineName, {
  pipelineName: codePipelineName,
  synth: new ShellStep('Synth', {
    // input: CodePipelineSource.gitHub('alazaroc/aws-cdk-pipeline', 'main'),
    input: CodePipelineSource.connection(
      'alazaroc/blog-backend-infrastructure',
      'main',
      {
        connectionArn:
          'arn:aws:codestar-connections:eu-west-1:xxxxxxxx:connection/fb936fb8-a047-43d5-90bd-xxxxxxxxxx', // Created using the AWS console * });',
      },
    ),
    commands: ['npm ci', 'npm run build', 'npx cdk synth'],
  }),
});
You must deploy the pipeline manually once. After that, the pipeline will be kept up to date from the source code repository.
If you run the cdk deploy command, as you can see the pipeline is created and automatically runs.
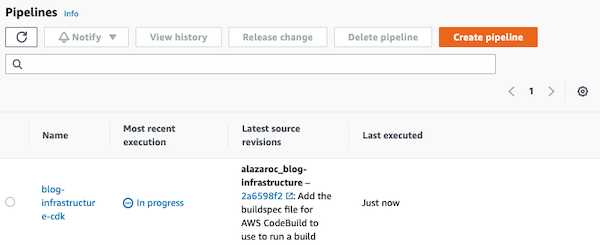
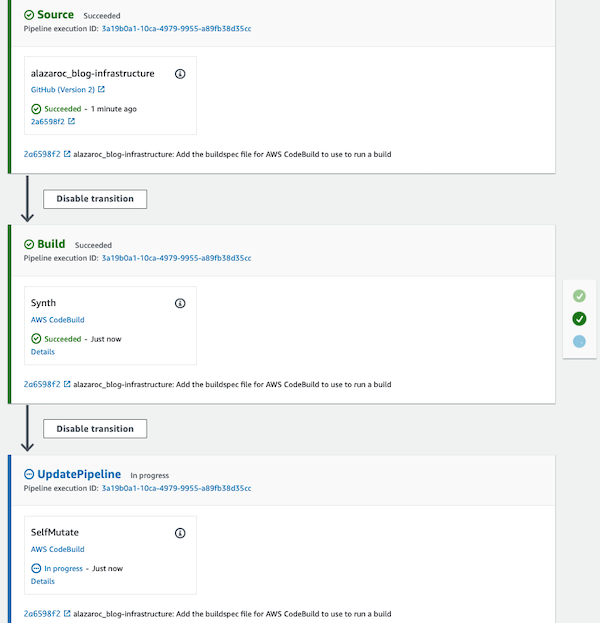
But wait a minute, we have three stages? A new one
SelfMutateappears. Well, let’s wait to finish…
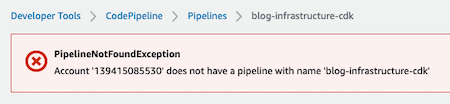
PipelineNotFoundException? What happened here? We waited for the pipeline to finish executing and the pipeline no longer exists!
Let’s do some research on SelfMutate. The CDK documentation says:
Whether the pipeline will update itself
This needs to be set to
trueto allow the pipeline to reconfigure itself when assets or stages are being added to it, andtrueis the recommended setting.You can temporarily set this to
falsewhile you are iterating on the pipeline itself and prefer to deploy changes usingcdk deploy.
We haven’t added this property to our code and the default value applied is true, so the pipeline has updated itself and, as the code is NOT committed in the source code, the pipeline has been removed.
We have previously executed the deploy command but not a previous commit.
I didn’t commit my CodePipeline code to make the result “more dramatic” (pipeline deleted automatically). But if you commit the code, nothing will happen. You will have one more stage to allow the pipeline to autoconfigure if there any changes, and at each run this will be checked.
I want to show you what will happen if you set the selfmutate property to false (and the code is not committed).
This is the change needed in the CDK CodePipeline resource code, adding this line:
1
selfMutation: false,
And if you run the cdk deploy command again, the pipeline will be updated:
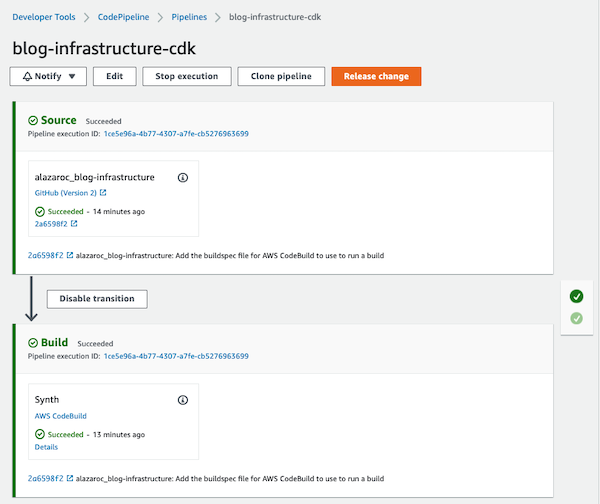
Now, there are only 2 stages in the CodePipeline, the Source and the Build, the 2 that we have configured and work perfectly.
3.2. CDK Deploy
We will change the code of our CodePipeline service so that instead of executing a cdk synth command, it will execute the cdk deploy command.
Also, to avoid the assumed role error we saw in the AWS Console example (in this same post), we will add the IAM permissions necessary to the CodeDeploy role to run the deploy command.
To customize the CodeBuild project, change ShellStep by CodeBuildStep. This class has more properties to customize it:
1
2
3
4
5
6
7
8
9
10
11
12
13
14
15
16
17
18
19
20
21
22
23
24
25
26
27
28
29
30
31
32
33
const codePipelineName = `blog-backend-infrastructure-cdk`;
  const pipeline = new CodePipeline(scope, codePipelineName, {
    pipelineName: codePipelineName,
    // synth: new ShellStep('Deploy', {
    synth: new CodeBuildStep('Deploy', {
      input: CodePipelineSource.connection(
        'alazaroc/aws-cdk-pipeline',
        'main',
        {
          connectionArn:
            'arn:aws:codestar-connections:eu-west-1:xxxxxx:connection/4d6c1902-bda7-43fb-8508-xxxxxx',
        },
      ),
      commands: ['npm ci', 'npm run build', 'npx cdk deploy --require-approval never'],
      rolePolicyStatements: [
        new aws_iam.PolicyStatement({
          actions: ['sts:AssumeRole'],
          resources: ['*'],
          conditions: {
            StringEquals: {
              'iam:ResourceTag/aws-cdk:bootstrap-role': [
                'lookup',
                'image-publishing',
                'file-publishing',
                'deploy',
              ],
            },
          },
        }),
      ],
    }),
    selfMutation: false,
  });
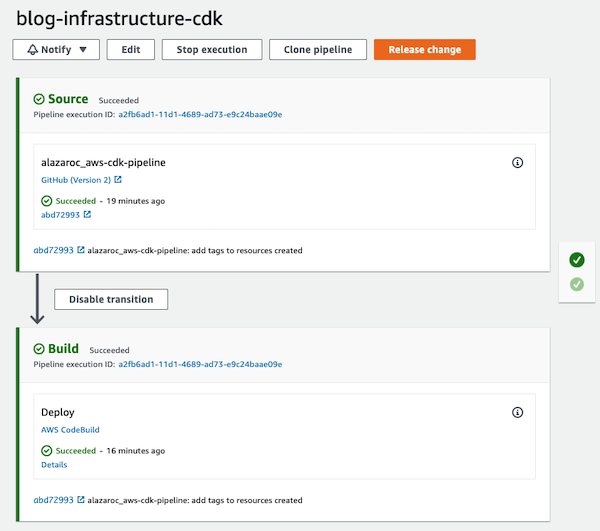
When you deploy it will create the CodePipeline project and execute the 2 steps defined:
- Source
- Build (
cdk deploy)
We changed the
cdk synthbycdk deployand also added the necessary permissions.
And since we have added the appropriate permissions, it doesn’t fail.
3.3. Recommended deployment of CodePipeline to CDK projects
This approach is a little different.
I will use this other example of CodePipeline for CDK, to make it easier to understand. Also, I will go step by step to understand perfectly how it works.
This is the final diagram of what we will build (with the CDK code):
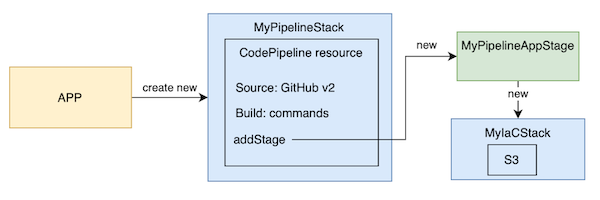
If you want to create the Pipeline of the CDK project you will need to include at least two stacks: one for the pipeline and one or more for the infrastructure that will be deployed with the pipeline.
Application deployment begins by defining MyPipelineAppStage, a subclass of Stage that contains the stacks that make up a single copy of my stack (MyIaCStack).
1
2
3
4
5
6
7
8
9
10
export class MyPipelineAppStage extends Stage {
  constructor(scope: Construct, id: string, props?: StageProps) {
    super(scope, id, props);

    const iaCStack = new MyIaCStack(this, 'iac-example-stack', {
      description:
        'Stack created with codepipeline in the example aws-cdk-pipeline',
    });
  }
}
Now, we define MyIaCStack, which contains all the AWS resources that will be created in a different stack than Pipeline:
1
2
3
4
5
6
7
8
9
10
export class MyIaCStack extends Stack {
  constructor(scope: Construct, id: string, props?: StackProps) {
    super(scope, id, props);

    // Add resources
    new aws_s3.Bucket(this, 'MyFirstBucket', {
      enforceSSL: false,
    });
  }
}
Finally, we create the main stack, MyPipelineStack, which will add MyPipelineAppStage as a stage within the CodePipeline resource.
1
2
3
4
5
6
7
8
9
10
11
12
13
14
15
16
17
18
19
20
21
22
23
24
25
26
27
export class MyPipelineStack extends Stack {
  constructor(scope: Construct, id: string, props?: StackProps) {
    super(scope, id, props);

    const codePipelineName = `test-iac-with-cdk`;
    const pipeline = new CodePipeline(this, codePipelineName, {
      pipelineName: codePipelineName,
      synth: new ShellStep('Synth', {
        // input: CodePipelineSource.gitHub('alazaroc/aws-cdk-pipeline', 'main'),
        input: CodePipelineSource.connection(
          'alazaroc/aws-cdk-pipeline',
          'main',
          {
            connectionArn: getMyGitHubConnectionFromSsmParameterStore(this), // Created using the AWS console * });',
          },
        ),
        commands: ['npm ci', 'npm run build', 'npx cdk synth'],
      }),
    });

    pipeline.addStage(
      new MyPipelineAppStage(this, 'Deploy', {
        // env: { account: "111111111111", region: "eu-west-1" }
      }),
    );
  }
}
We have to commit all the above changes, and after that deploy it.
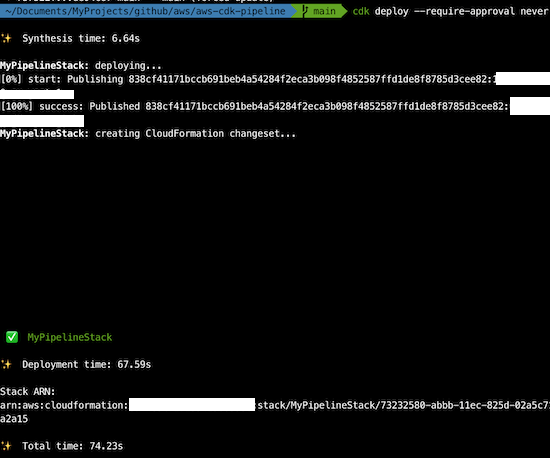
It will create:
- the main stack with the CodePipeline, MyPipelineStack,
- the Deploy-iacStack
First, the pipeline stack is created, and then, when the CodePipeline is executed, the second stack which contains all the other resources is created.

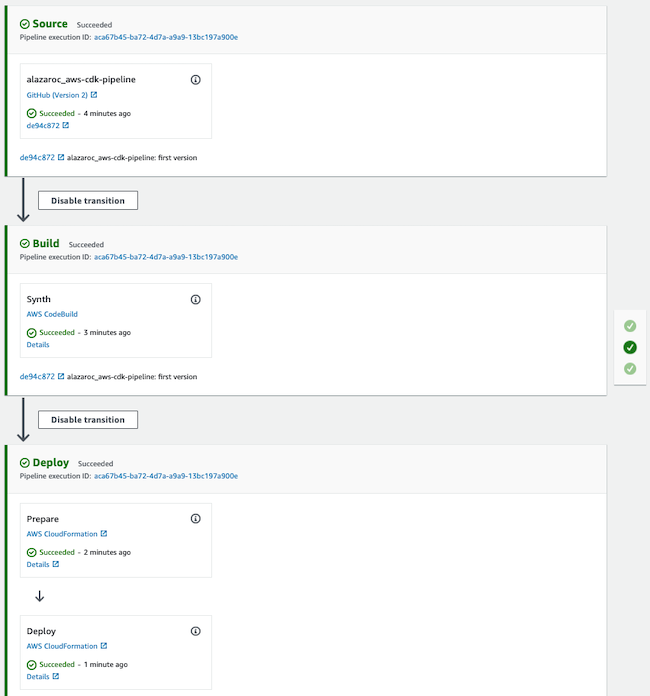
That is all, we have automation in our deployment process!
So as you can see, using CDK’s CodePipeline constructor, the following is created:
4. Next steps
Further reading:
- SAM + CDK: Interested in how AWS SAM and AWS CDK can work together? I’ve explored this in another article: How to create serverless applications with CDK and SAM. It’s a great next step for those looking to expand their serverless architecture knowledge.
- SAM: How to create Serverless applications with SAM
- Terraform: How to create Serverless applications with Terraform
I look forward to hearing your thoughts and experiences with AWS CDK. Feel free to share them in the comments below. Happy coding!