How the AWS Well-Architected Tool Can Transform Your Cloud Architecture (4/4)
This is my fourth and final article in a series about
AWS Well-Architected.This is a practical guide to using the
AWS Well-Architected Toolto assess, improve, and continuously optimize your workloads, with screenshots and step-by-step guidance.More articles of the series:
- 1/4 - Overview of the AWS Well-Architected Framework: Learn why the AWS Well-Architected Framework is essential for every cloud professional and how it can set your cloud architecture up for success.
- 2/3 - Deep Dive: Six Pillars: Dive into the details of the Six Pillars, uncovering the best practices for building secure, resilient, and cost-efficient cloud systems.
- 3/4 - Quick Wins for Each Pillar: Discover actionable quick wins for each AWS Well-Architected Pillar, helping you optimize cloud performance, security, and cost-efficiency.
1. The AWS Well-Architected Tool
The AWS Well-Architected Tool (AWS WA Tool) is an interactive, web-based service that helps you assess your workloads against the six pillars of the AWS Well-Architected Framework. It offers a clear view of your architecture’s strengths and weaknesses and provides actionable recommendations to help align your systems with AWS best practices.
This tool is more than just a guide. It’s a hands-on resource designed to simplify and enhance your architecture assessment process.
Using the AWS Well-Architected Tool allows your team to self-assess your architecture and identify areas for improvement. However, an official review conducted by an AWS Well-Architected Partner provides a more in-depth evaluation and often includes a comprehensive remediation plan.
While the AWS Well-Architected Framework sets the foundation for best practices, the AWS Well-Architected Tool takes it a step further by turning those principles into actionable insights for your specific workloads.
2. Why You Should Conduct a Well-Architected Assessment
The AWS Well-Architected Tool offers a straightforward way to assess, refine, and optimize your cloud architecture, turning best practices into actionable improvements.
Benefits for You
Improve Your Cloud Skills: Deepen your understanding of cloud architecture through hands-on evaluation and improvement.Build Confidence with AWS Best Practices: Become proficient in applying AWS’s best practices to real-world scenarios.Lead Strategic Discussions: Use assessment insights to guide stakeholders towards more informed architectural decisions.
Benefits for Your Cloud Architecture
- Identify Weaknesses and Risks: Quickly spot issues like security gaps, underutilized resources, and performance bottlenecks.
- Optimize with Data-Driven Insights: Use the tool’s analysis to enhance performance, strengthen security, and boost efficiency.
- Receive Tailored Recommendations: Get customized guidance directly aligned with your specific architecture’s needs.
- Generate Detailed Reports: Create reports that not only provide a clear view of current architecture but also outline strategic steps for improvement.
- Align Teams Around Priorities: Use the assessment process to unify your team’s focus on key improvement areas.
- Lower Costs: Identify over-provisioned resources or inefficient setups, enabling cost savings without compromising performance.
Regular assessments ensure that your architecture evolves with your business and continues to meet evolving best practices. Here are additional benefits of conducting regular assessments:
- Promote Continuous Improvement: Keep your cloud systems evolving with your business needs and technological advancements.
- Future-Proof Your Architecture: Ensure scalability and readiness for future challenges.
3. How to Conduct a Well-Architected Assessment: Step by Step
Step 1: Access the Tool
Log into the AWS Management Console and open the Well-Architected Tool.
Step 2: Define a Workload
Provide details about your workload to begin the assessment. A workload can be a customer-facing application or a backend process. Essentially, any set of resources delivering business value.
AWS definition: “A workload refers to the resources and code that deliver business value, such as a customer-facing application or a backend process.”
Steps to Define a Workload:
- Workload Information: Enter details about your workload.

- Apply Profile: Select a profile that matches your workload’s requirements.

- Apply Lenses: Use the default AWS Well-Architected Framework Lens for simplicity.

AWS definition: “The Lens Catalog is a collection of official, AWS lenses created for AWS Well-Architected Tool that offer up-to-date technology and industry-focused best practices.”
Step 3: Conduct the Assessment
Answer questions for each pillar to evaluate your architecture’s status.
Important: You can answer as many questions as you’d like. Even a few responses can provide valuable insights to improve your workload.
How to Answer Questions
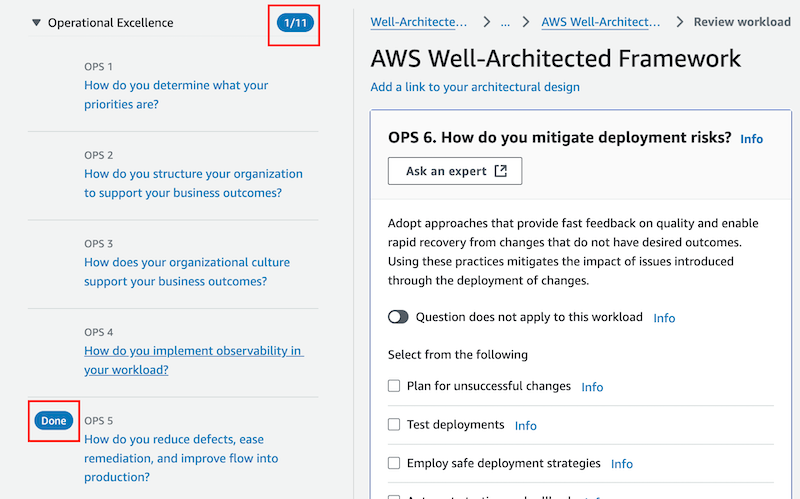
- Navigate the Review Page:
- The page has three main sections:
- View Questions per Pillar: You can collapse or expand each pillar for easy navigation and track the number of questions you’ve answered.
- Understand Question Details: Review the question details, assess the related best practices, and select those you follow
- Use the Help Section: Click
infofor a brief explanation about the best practices.
Example: Answering OPS 5
Let’s work through an example with OPS 5:
OPS 5. How do you reduce defects, ease remediation, and improve flow into production?
Adopt approaches that improve flow of changes into production, that enable refactoring, fast feedback on quality, and bug fixing. These accelerate beneficial changes entering production, limit issues deployed, and enable rapid identification and remediation of issues introduced through deployment activities.
Read through the best practices provided and assess how well your workload aligns with them. For example:
The first best practice is
Use version control. Let’s suppose we are using GitHub as Git repository, so we can select the check field of this best practice, and move on to the next one.The next one is
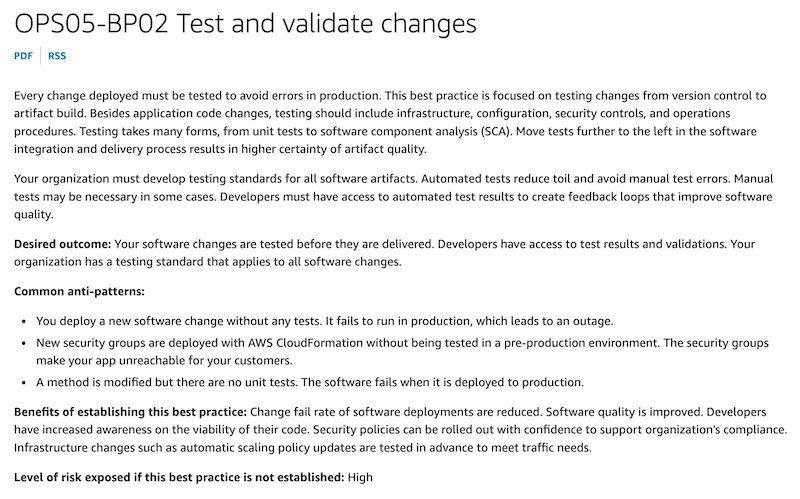
Test and validate changes. This one is tricky because you can think “I perform manual tests to validate the changes, so I can select it”. However, the info show us the following information about the best practice:Every change deployed must be tested to avoid errors in production. This best practice is focused on testing changes from version control to artifact build. Besides application code changes, testing should include infrastructure, configuration, security controls, and operations procedures. Testing takes many forms, from unit tests to software component analysis (SCA). Move tests further to the left in the software integration and delivery process results in higher certainty of artifact quality.
Do you need more information about specific best practices?
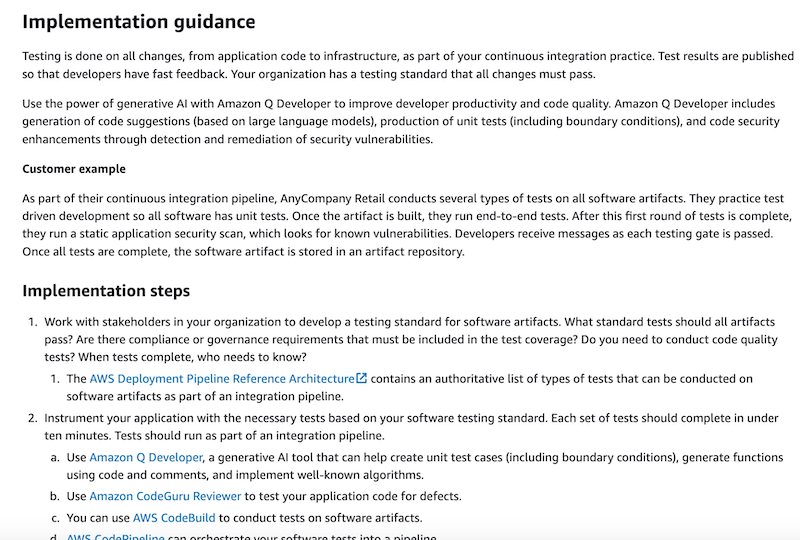
Check the Appendix: Questions and best practices for more details.
You’ll find:
- Detailed descriptions
- Desired outcomes
- Common anti-patterns
- Implementation guides
Example:
Let’s complete the review of this question, only selecting a few of the best practices:
When you save a question, for instance, by clicking Next to proceed to the next one, you’ll notice that the left section of the screen indicates that one question for this Pillar has been completed.
Save your changes (Save and exit) to see the Workload Overview, which highlights any detected high or medium risks.
I recommend you to review the Appendix: Questions and best practices. to get more information about the best practices.
Step 4: Review the Recommendations
Once you’ve completed some or all of the questions, it’s time to review the tool’s recommendations.
The AWS Well-Architected Tool provides personalized recommendations to address identified gaps and potential risks.
- Access the
Lensestab and navigate to theImprovement Plan. 
- Identify high-risk areas, like OPS 5 in this example, and click through to see which best practices need improvement.
- The tool will list actionable steps, such as “Test and validate changes” or “Perform patch management.”

Step 5: Generate the Report
After completing your assessment, you can generate a detailed PDF report.
The report summarizes findings, highlights key risks, and provides actionable next steps. It’s an excellent resource for communicating with stakeholders.
Step 6: Review the Report
The PDF report provides a comprehensive view of your assessment:
- Workload Information
- Lens Overview: Displays the number of questions answered per pillar.
- Improvement Plan: Shows the number of high-risk and medium-risk items identified per pillar.
- High Risk detail: Lists the questions with high-risk issues detected for each pillar.
- Lens Details: Provides a summary per pillar, including your responses and areas needing improvement.
- Improvement Plan: Lists best practices to mitigate the adress risks.
The detailed information in the report ensures that you have a clear path to optimize your cloud architecture.
4. What Happens After the Assessment
As discussed in the previous section, using the tool generates an Improvement Plan, listing the best practices you need to address. However, it’s now up to you to implement those changes.
An assessment is just the starting point. The real value comes from how you act on the findings and turn insights into tangible improvements.
- Prioritize Recommendations: Focus first on the most critical actions, aligning them with your business goals and technical needs.
- Create a Roadmap: Use the assessment findings to plan the next steps, track progress, and ensure that improvements are implemented effectively.
- Schedule Regular Assessments: Incorporate periodic reviews into your workflow to stay aligned with AWS best practices and ensure continuous optimization.
- Foster Team Collaboration: Engage all relevant teams, both technical and business, to make it easier to achieve shared architectural goals.
The Well-Architected assessment is an ongoing journey. Continuous iteration and reassessment are key to evolving and optimizing your architecture over time.
5. Too Complex? Need Help? AWS Partners Have You Covered
For complex workloads or when time constraints make self-assessments challenging, AWS Well-Architected Framework Partners bring the expertise to ensure a thorough evaluation and seamless implementation.
Here’s how they can assist you:
Conducting a Review: Partners can perform an official AWS Well-Architected Review, offering a deeper and more comprehensive assessment than a self-guided one.Creating a Statement of Work (SoW): They’ll help generate a SoW to formalize a plan for implementing the recommended changes.Implementing Improvements: Partners can also assist with putting the changes into practice, ensuring that your architecture aligns with best practices for security, performance, and efficiency.
Working with a partner can be especially beneficial for complex workloads or if you’re looking to achieve rapid improvements.
6. Conclusion
The AWS Well-Architected Tool offers a powerful way to assess and improve your cloud architecture. Start using the tool today to identify weaknesses, optimize performance, and reduce costs. Remember, the key to a well-architected cloud is continuous assessment, improvement, and adaptation.
Don’t wait until issues arise. Start using the AWS Well-Architected Tool today to ensure your architecture is optimized for the future. With every assessment, you take a step closer to building a more secure, efficient, and cost-effective cloud environment.
For further reading, explore AWS’s comprehensive resources:
- AWS Well-Architected Tool (new links)
- Links provided in previous articles


